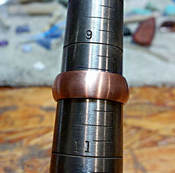
 Math and Mandrels Why ring mandrels are not the final answer in ring sizing. When I began my career in Jewelry making back in 2009, money was tight and I had a limited budget for tools and equipment so, like many of us I made do with second hand tools and value line products from the major Jewelry supply warehouses such as Rio Grande, Otto Frei and Contentti. My ring mandrel in particular was both second hand, and a value line model made overseas. Sure it had dents and dings in the tool steel but the ring size markers were clearly defined and easy to read, and that's all you need in a ring mandrel anyway right? So tools in hand, I started making and selling rings for the market. My ring making process at the time was the same as how many are taught: wrap the material around the mandrel at the size you want, mark where the ends cross over, saw, file, and solder. Then forge round again over the mandrel and double check the size on the line, so the middle of the ring rests on the line of the mandrel. Standard method right? And for a while everything was good and fine..until the rings started coming back to me for re-sizing...again...and again...and again... There was clearly a problem. So I went back to my books. Studied the charts. Scoured the Internet. What did I learn? There is a lot of inconsistency and precious little standardization in the Jewelry industry. First, there was clearly room for improvement in my method. Wrapping stock around the mandrel creates more waste than necessary. It also introduces variables that make the cut length a bit more random than it should be. How tight do you wrap the material? How close are you to the size line on the mandrel? How accurate are your cut markers? How wide of a kerf does your saw blade take in respect to your cut markers? And so on. So first step: remove the random elements, as much as possible. Cut length can be calculated accurately and easily with simple math and basic geometry. A brief review of a circle:
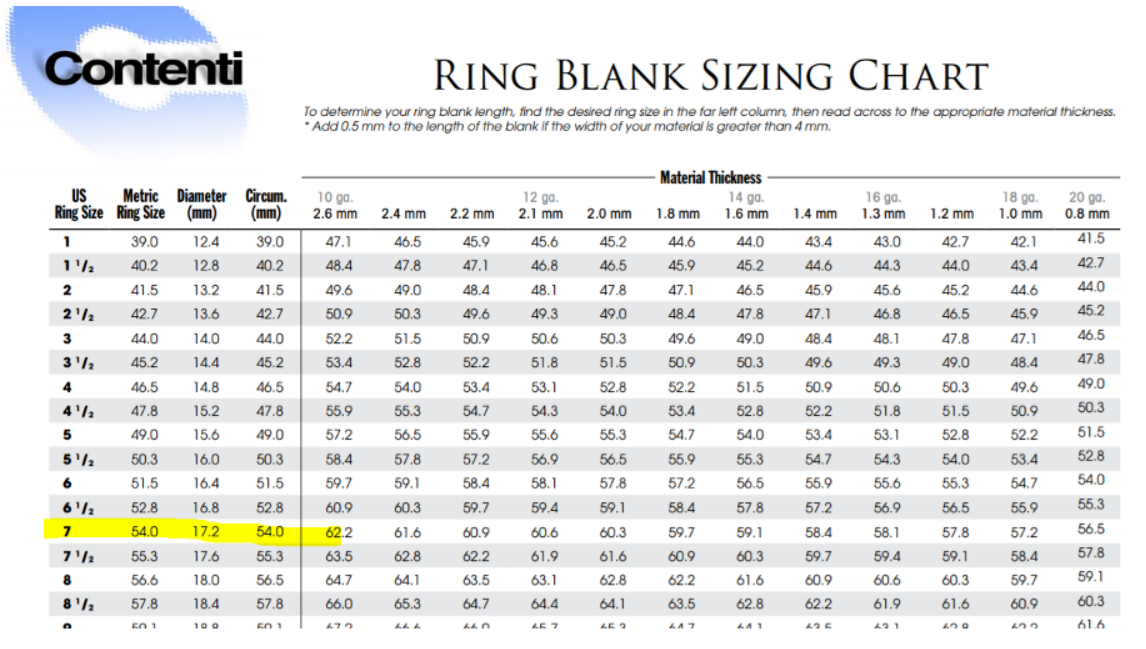
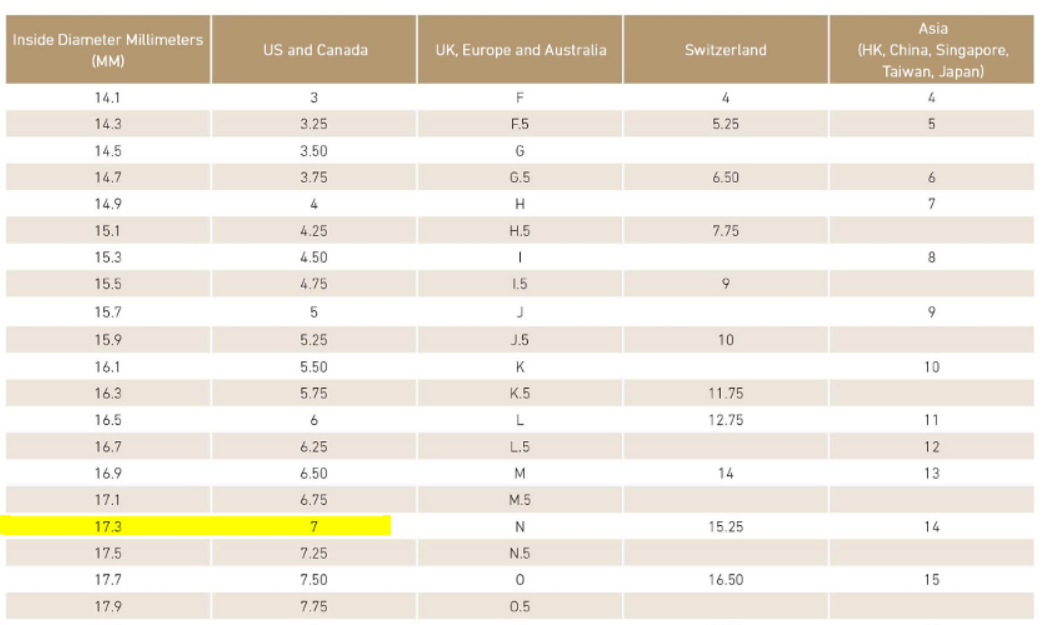
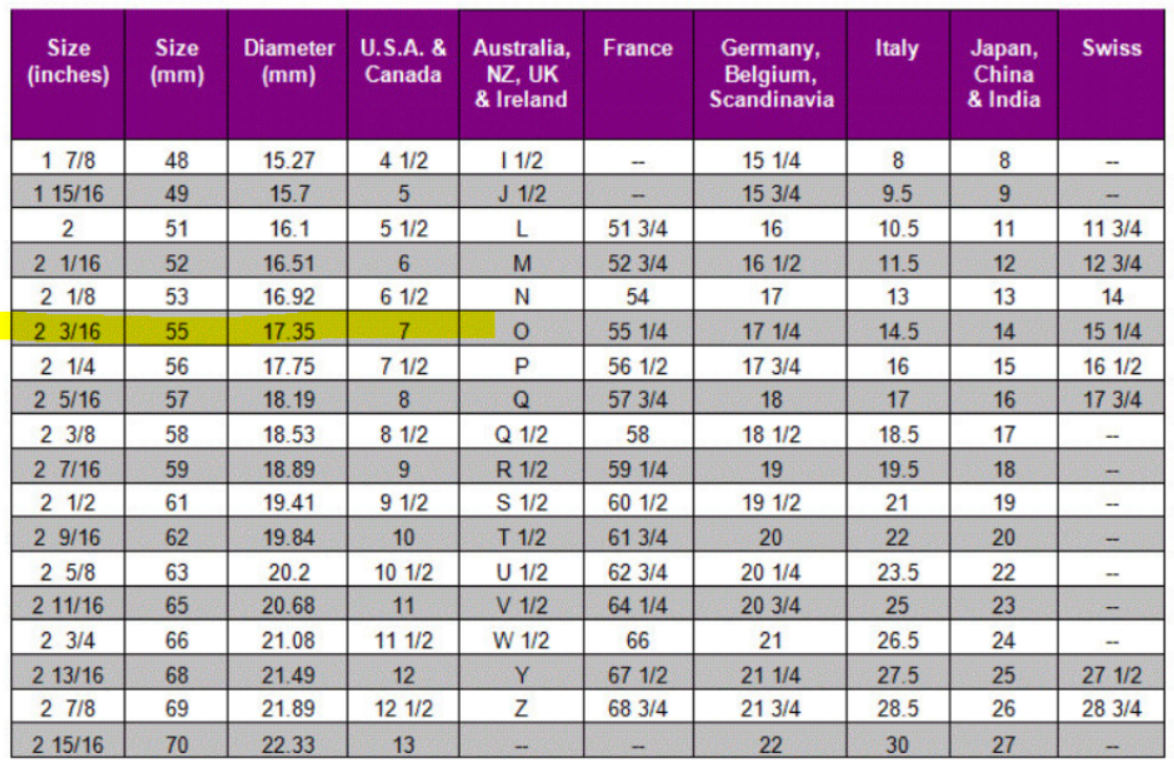
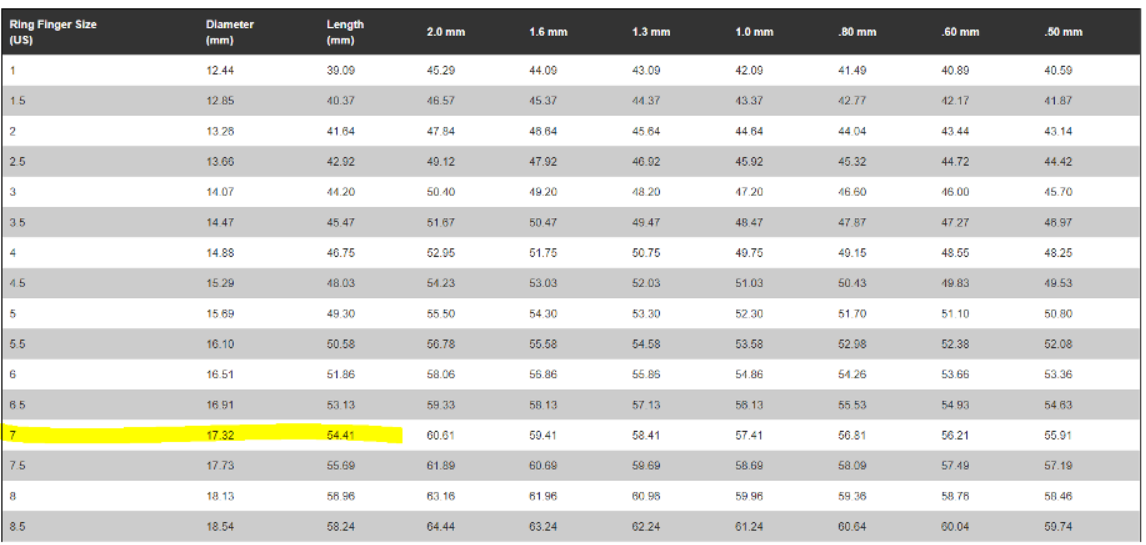
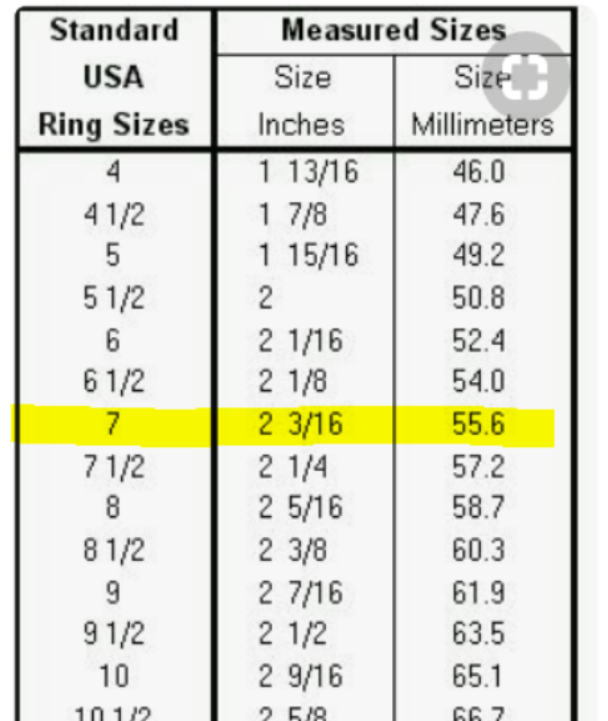
To determine the length of material needed for a ring of a particular size and material, the formula is: Length = (Inside Diameter of the ring + thickness of the material) * 3.14 Or if you have circumference: Length = Circumference of the ring size + (Thickness of material * 3.14) Material thickness can be found with a pair of accurate calipers, measured at the thickest part of the material stock. Circumference and diameter of a specific ring size should be a constant defined by the Jewelry industry, for which we turn to readily available charts. The problem though, is that not all of these charts are necessarily accurate either... So a size 7 should have a 17.2mm diameter and circumference of 54.4mm...wait, a 17.3mm diameter. No, a 17.35mm diameter. Errr, 17.32mm...no, 55mm circumference...no 54.41mm circumference. No, a 55.6mm circumference...? Huh? What's going on here? Some of these charts are rounding up. Some round down. Some are calculating based on PI of 3.14. others are using more precision at 3.14159265359...or more...or less. And a couple of them, are just plain wrong. Whichever chart you decide to use for your Circumference and Diameter constants, be sure to cross reference it against other charts. If it varies more than a couple thousandths of a mm...don't use it. A variance of 0.5mm can result in a different ring size entirely. I also suggest doing some random sampling across the chart you use and doing the math to make sure the diameter and circumference values it gives you for a specific size agree with each other. Circumference = diameter * pi. Diameter = Circumference / pi. It's worth the peace of mind to do some verification. Some of these charts don't even agree with themselves. Now I have everything necessary to find the length of material I need to cut for a specific ring size and eliminate the randomness. I cut material for a ring, size 7 out of 18 gauge stock, 3mm wide, 1mm thick and use my chart's inside diameter of 17.32mm to calculate length: (17.32+1) * 3.14 =57.52mm cut length. I take out my precision digital calipers, make sure they're zeroed out, mark my metal, saw through the line and make the ring. I forge it out on my ring mandrel and lo' and behold, it measures a size 6 ¾. Umm, what? So I get out my calipers and check that inside diameter: yup, 17.33 darn near perfect. It should be a 7...it is a 7...the math proves it...but the mandrel says 6 ¾. Guess what? My second hand, value line ring mandrel does not size accurately. I grab my set of ring finger sizers and dig around for the size 7 and put that on the mandrel. The sizer on the mandrel shows a size 7 ¼. Now I'm cursing. I drive down to the hobby craft store and buy one of those black plastic ring size mandrels, racing through the checkout and tearing open the packing as soon as I'm in the car. I put my size 7-by-the-math-ring on it. It's a size 8 ¼. I'm pretty sure I did not step through a portal to the Twilight Zone on my way to the hobby shop. Over the next few months I try 4 other “professional” stainless steel ring mandrels. I get 4 different results on my size 7-by-the-math-ring. Some are close. Some are wildly off. Ring mandrels vary wildly by maker and materials. After a lot of searching, I found a maker advertising precision calibrated ring mandrels. I bought 4. My 7-by-the-math-ring slides on, and it measures a 7 at the bottom edge of the ring, both sides of the ring...on 3 of the mandrels. The 4th mandrel...was a lemon and machined out of round. I kept the 3, returned the 4th. You can never have enough mandrels in the workshop anyway. At last, ring size Nirvana! In the years after changing my process to calculate size by math and geometry and finding calibrated ring mandrels that actually agree with the math, ring re-sizing requests have become a rarity at my shop. When it does come up, it is usually due to one of these issues:
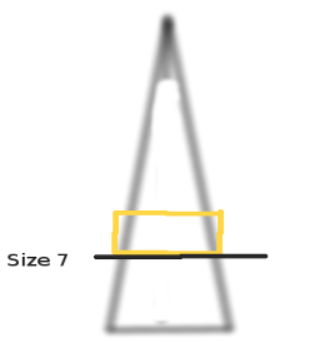
Minor Quibbles – Measuring rings on a ring mandrel There is a great deal of debate among Jewelers on the subject of measuring a ring on a ring mandrel by the bottom edge of where the ring comes to a rest on the mandrel, or taking that measurement in the middle of the ring band. My thoughts on this, besides the fact that the math and bottom edge of the ring size agree according to my calibrated equipment - is that when making traditional, flat-stock ring bands with straight sides, only the bottom edge of the ring actually touches the mandrel and so this is the correct place to take the size reading. If I was taking a size on a ring that had a rounded inner ring band, such as a comfort fit band, then taking the reading based on the middle of the band makes sense since that is where the ring touches the mandrel and this is how I size all of my comfort-fit rings. If I was forging flat ring bands on a mandrel and taking the size reading at the middle of the ring band, the bottom edge of the ring would be stretched wider than the middle of the band and top edge. The resulting ring would be cone shaped. If you were then to flip the ring around and forge the ring again so that the size is again in the middle of the flat band, you would have a convex shaped ring with both edges flaring outwards from the middle. I cannot agree with this. A flat ring band should be sized based on the resting place of the bottom edge of the ring, checking both sides of the ring to make sure they are in agreement. Comfort fit rings with a rounded inner band should be measured in the middle of the ring. Very wide band rings should be ordered a half size up to account for the extra compression on the finger. In my mind, this is logical. Crappy Illustration: Only the bottom edge of the ring contacts the ring mandrel. This is where sizing should take place IMO, not the middle space that does not contact the mandrel, and NEVER measured at the top edge.
1 Comment
|
DLC GemsDLC Gems on Facebook ArticlesForging A Fold Form Leaf Necklace
Autumn Leaves In Copper A Tale of Two Stones How I carve Fire Agate Custom Jewelry for Metal Allergies Seven Stars for Seven Daughters Archives
February 2018
Categories |
 RSS Feed