How I carve Fire Agate #dlcgems #fireagate 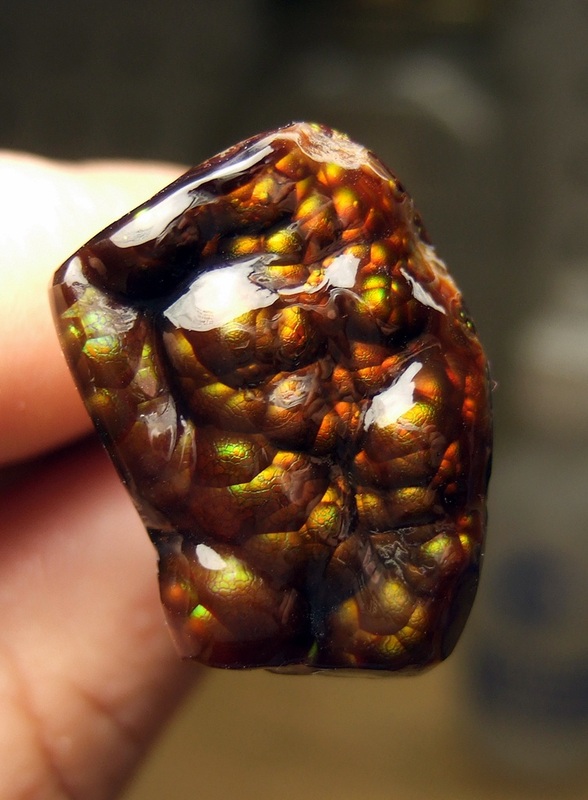 Deer Creek Fire agate carved by Don Christensen. Carving a fire agate allows you to work material that would otherwise be ruined by the cabbing process. Fire agate forms in bytrodial layers and rarely conform to shapes that work well for cabs. The only way to remove all of the dark chalcedony from the fire agate layers without cutting into the fire is through the carving process. Be sure to follow us on Facebook to stay current on our latest work, events, shows and tutorials. https://www.facebook.com/dlcgems Shop with us on Etsy https://www.etsy.com/shop/dlcgems Tools & Equipment for Carving
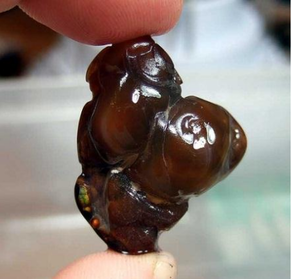 Start with your piece of rough fire agate. If the fire agate has a thick cap of chalcedony on it you’ll want to carefully trim and/or grind it off as much as possible, being careful not to cut into the fire layers. Here, I have a small piece of rough that I tumbled for a couple days in 69/90 grit to clean it up. 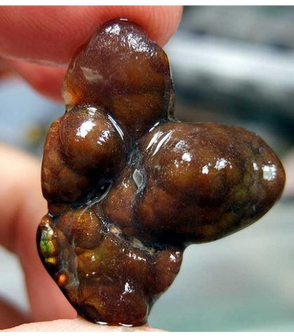 Using your flex shaft and coarse diamond bits, grind away the remaining chalcedony to expose the fire layers. Be sure to keep the stone and the diamond bits wet, and keep the pressure light…you’ll just wear out your equipment faster if you try to speed up the cutting by pressing too hard. If possible leave a thin layer of chalcedony just above the fire layers and then switch to your fine grit diamond bits to remove the rest of the chalcedony, being very careful not to grind into the fire. In the picture you can see that I’m following the contour of the fire agate layers; carefully exposing the fire but without grinding into the fire itself. The fire layers are extremely thin, so if you hit them you’re likely to grind the color to dust. 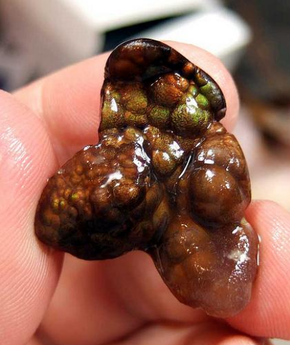 Continue carving until you have exposed as much color as possible following the contour of the fire layer. In this picture you can see the nodules of color being exposed and the dark brown chalcedony removed. The green, yellow and orange color layers didn't go very far in this piece, however there are lots of nice nodules of bronze fire. on the left hand section, you can see a mistake I made, carving too deep and into the color nodules in my attempt to find better colors. This is a pitfall that many carvers fall into. You can see this more clearly as this piece progresses. Learning to know when to stop cutting is a valuable lesson. 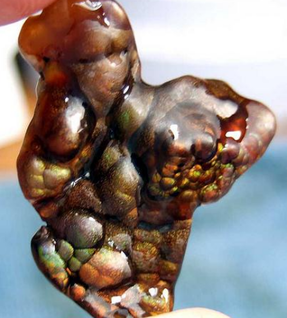 When you have completed carving out the color with the diamond bits, the next step is to smooth out your carving by removing the cut marks left by the coarse diamond and preparing the stone for polishing. This step can take several hours. I begin with 325 grit diamond paste working it over the stone with small burs I make out of the 1/8” hardwood dowels. The picture on the left shows the stone after several hours of working out the cut marks with the diamond paste. To make a bur from the dowel, cut off a 1” length, chuck it up in your hand grip and then file a point on one end using a file. 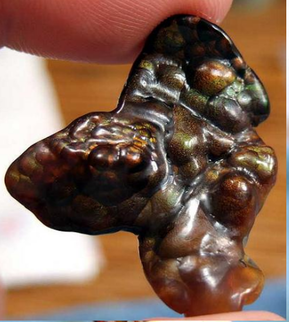 At this point you can switch over to your stiff bristle brushes and work 600 grit diamond paste over the stone until the 325 grit’s scratch marks are gone. Use a new brush for each grit, and wash the stone and your hands between grits with soap and warm water to prevent cross contamination. If you find a stubborn spot or hard to reach area use a wooden bit with a point shaped to work the area. 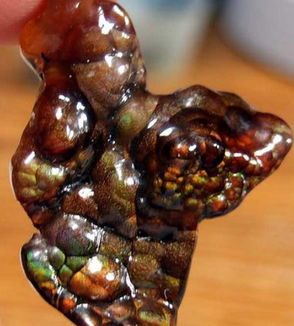 Here's the carving after polishing with 1200 grit diamond paste. Sometimes ensuring that you've covered the entire stone after each grit can be difficult, so I use a cover coat as a guide on hard stones with fire agate with no fractures. Black sharpie marker in this case is a great cover coat. When the black cover coat is gone, I know that I've covered the entire stone and can move on. 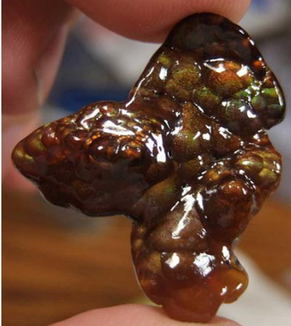 The fire agate is now polished to 3000 grit diamond. At 3000 the colors start to really show off and shine but don't stop here; your fire agate carving deserves the best polish possible.  Fire agate polished to 8000 grit. 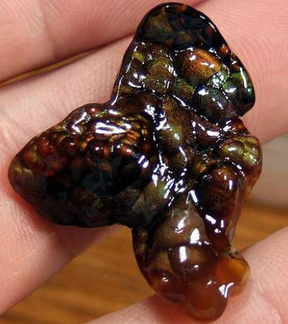 Fire agate polished to 14,000 grit. 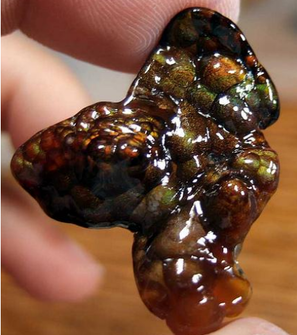 Fire agate polished to 50,000 grit. Once your carving has achieved this level of polish, you have a couple of final finishing options. For instance, you could polish to 100,000 for ultimate shine. Some carvers like to put a final oxide polish using Titanium Oxide, or a very high grade Cerium Oxide, while others will use M-5, or a mix of polishing compounds. If you decide to use a final polishing compound, a felt disk on a mandrel can be used to work the compound over the stone. Be careful not to let the stone get too hot while doing so, or else you'll risk damaging the stone and ruining the finish. Use a file to put an edge on the disk to get into the tight spaces of the carving. felt points are useful as well. I hope you have enjoyed my fire agate carving tutorial, please leave a comment here or on Facebook and let me know your thoughts. Every fire agate carver seems to have their own techniques and equipment preferences, and I would be curious to hear about yours.
The information and pictures presented here are the intellectual property of Don Christensen and DLC GEMS LLC. Do not publish elsewhere without express written consent. @2014
17 Comments
Dave
9/19/2014 08:40:31 am
Nice job very informative!
Avis Quinn
9/23/2014 08:42:48 pm
awesome. Thanks for the tutorial! 10/27/2014 10:35:54 pm
I always wondered how this was done and I can now see that it is a long/difficult process.
Agate The Christie
11/3/2014 11:56:44 am
Wow, I did not expect that brown/red turd to turn into that. I have a question. Ive searched agates for a while and Ive seen different grades etc. But this guy I know can get a ridiculous polish on a stone, as in he buys other peoples stones and somehow high polishes them so they let even more light in/out. I heard about 10,000 and cesium powder, even heard some people use plain leather to polish them. I wasnt even aware of the 50,000 or 100,000...
Thank you Christie, I''m glad you enjoyed the fire agate carving tutorial!
sean
11/10/2014 03:24:40 am
Thank you. Sweet tutorial, been sitting on pieces of Slt. Mtn..waiting for my cabbing or carving class to begin..think I'll get some tools and polishing compounds instead of wait!
Liz
3/5/2015 05:51:54 am
Thank you for this tutorial! I know it is a bit old now, but I have just discovered it, and I've found it to be incredibly informative. Being 23 and a budding jeweler, cutting fire agate by hand has been a hobby of mine, but I struggled until now to find out a good way to polish them.
danny
9/22/2015 01:39:47 pm
thank you for the tutorial on fire agate . i found it very interesting .i've seen it tumbled but only carved on the internet and i was wondering how they carve it . i live on the east coast and dont see much of thisin the rough .again thanks million .
Mike
1/2/2016 02:06:52 pm
Thank you Don. My only experience with fire agate was when I lived in Oregon 30 years ago. I was in awe, these were the bumpy stones with lots of deep blue & purple, and of course the reds, etc.. forget diamonds, I fell in love with fire agate. Thank you for all the very detailed information, you obviously have a passion for these also. When I decide to get into something, I go all the way. I won't buy anything over $40.00 without reading reviews. I'll look into this now that I'm in my early 50's and settled down enough for the patience to polish with so many steps and bit changes. Great work and kudos for such a well laid out site Don.
Mike Sturma
2/11/2016 12:42:35 am
Thank you for a very informative tutorial. In the Facebook group Fire Agate fans people are always asking how to work these wonderful stones.
fatcha brute
6/15/2019 09:42:16 pm
Don, my dog makes thoes every day , but he doesn't polish them , could you explain how he could polish them.
KJW
10/12/2019 11:29:37 pm
FATCHA BRUTE Leave a Reply. |
DLC GemsDLC Gems on Facebook ArticlesForging A Fold Form Leaf Necklace
Autumn Leaves In Copper A Tale of Two Stones How I carve Fire Agate Custom Jewelry for Metal Allergies Seven Stars for Seven Daughters Archives
February 2018
Categories |
 RSS Feed